Saturday, 25 September 2021

Review: Outwell Sleepin Double 3cm Self-Inflating Sleeping Mat

I'm really not a fan of airbeds/mats; I wriggle a lot in the night and I find them a bit bouncy. The wife wriggles even more than me, and after a recent trip where I spent most of the night being bounced up and down every time she re-enacted River Dance in her sleep, I decided we needed a better alternative. And as you may have gathered, I'm a fan of self-inflating mats.

It's surprising just how few self-inflating double sleeping mats are available, and of those that do exist, even fewer are readily available here in Spain. Fortunately, one of those that was easy to get hold of - and for a very reasonable price - was the Outwell Sleepin Double.

The Sleepin Double is available in three thicknesses - 3cm, 5cm and 7.5cm. I went for the 3cm due to the combination of size, weight and price. I'm used to sleeping on 3cm mats so it seemed perfectly adequate for my needs. I have several Outwell products and have always found the quality to be very good, and first impressions of the mat were very positive; it comes with a storage bag and compression straps to help squeeze the mat down and keep it there when packing away, and the cover is good quality and seems like it will be hard-wearing.

The mat is effectively two single mats joined in the middle, and the join functions as a hinge so that the mat can also be used as a 6cm single mat - a nice touch. Both sides of the mat have their own valve so they can be tailored individually (by way of the amount of additional air blown in) to suit each person, and I was pleasantly surprised at how much the mat actually does self-inflate (there's a reason for this which I'll come back to), and it actually needed very little in the way of topping up. So far so good.

Packing it away, however, isn't the easiest task; over four-or-five attempts, I haven't been able to get the mat to roll properly - it always seems to want to twist as I get to the last quarter or so, no matter how carefully I roll it and ensure the two long edges are parallel. Fortunately the included storage bag is fairly roomy, and given that this isn't the kind of mat you would be taking wild camping, thus trying to force into a rucksack, it isn't the end of the world if it doesn't pack down as neatly as it should.

Now, to come back to why the mat self-inflates so quickly; many (if not most) self-inflating mats - particularly the ultralight mats I am used to using - use die-cut foam as the filler. Basically, in order to keep the weight down, the foam is not a solid slab, but has sections cut out of it. This also allows them to pack down to a compact size. Consequently, however, they generally need a good "topping up" via the valve as more air is required to "fill the gaps". The Outwell Sleepin Double is essentially just a slab of foam, hence why it pretty much inflates itself. Now because of this it is both heavier and bulkier (when packed) than it needs to be, though as mentioned this isn't a hiking mat so that isn't necessarily an issue.

What is an issue - and one that I never considered beforehand - is that the additional air in the die-cut mats actually provides a lot of cushioning and therefore comfort. So not only is the Sleepin Double less comfortable by comparison, it is without a doubt the least comfortable mat both myself and my wife have ever used. And I can't understate that. We both suffered a terrible night's sleep and woke next morning (if you can call it waking, after never really being able to get to sleep) with aching hips and backs. While admittedly I haven't tried it doubled-up in "single mode" (and there is very little argument for doing so on my part, given the single mats I already have), I would never use this mat as a double mat ever again. I would go so far as to say it isn't fit for purpose, if its purpose is to provide a comfortable night's sleep.

Now I appreciate everyone has different perspectives of "comfort", hence why there are so many choices of regular bed mattresses, but generally-speaking I'm not that picky - I've had a good night's sleep in an empty bathtub before - so for me to say it's uncomfortable is not a good sign. And it's a shame, because it's an otherwise well-priced, quality product in an under-saturated market; Outwell could have cleaned up here. But instead they dropped the ball, didn't do enough R&D and seemed to think sticking a slab of foam in a cover was sufficient - and it isn't.

So while I can't speak for the 5cm and 7.5cm variants - which arguably should offer a higher degree of comfort - I cannot possibly recommend the 3cm model, and would go so far as to say avoid it completely. There are far better options (albeit in the form of two single mats as opposed to one double mat) assuming comfort and a good night's sleep - and not convenience - are your priority.


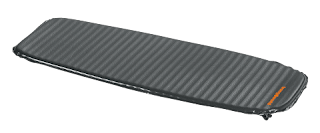
Outwell Sleepin Double 3cm Self-Inflating Mat


NOTE: Outwell also make single versions of the Sleepin mats, which presumably used the same solid slab of foam. So again, on this basis I would avoid the 3cm version - there are much better mats of this thickness and in a similar price range. 


Tuesday, 24 August 2021

Review: Naturehike Mongar 2 Two-person Hiking Tent

After a recent camping trip in 30 degree heat and 90% humidity that was so ghastly that we had to abandon it two days in, I decided what I needed was an inner-pitch-first tent. While a lot of people don't like this design due to the fact that it isn't ideal for pitching in the rain, certain implementations of this design allow for leaving the flysheet off, and that's exactly what I wanted.

It didn't take much investigation before I came across the Naturehike Mongar 2, a free-standing inner-pitch-first tent that also ticked a lot of other boxes. 


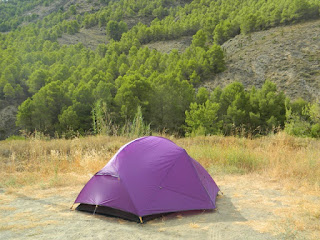
Naturehike Mongar 2 two-person hiking tent


As always, the first thing I did when my Mongar 2 arrived was get it on the weighing scales. Naturehike advertise its weight at 2.2kg all-in, including the supplied footprint (yes, the footprint comes included - other manufacturer's take note!). My scales said 2.157kg, so we were off to a good start.

While my current go-to hiking tent - the Wild Country Zephyros 2 - weighs in at 1.854kg, I'd surprisingly never weighed it together with the footprint, and here's where things start to get interesting; excluding pegs, the Zephyros 2 and footprint have a combined weight of 2.209kg. Remove the pegs from the Mongar 2, and the total weight is 2.031kg! Despite being much larger, the Mongar 2 is the lighter tent.

Pitching is ridiculously quick and easy - on my first time pitch, I single-handedly had it up in a fraction over 4 minutes - the fastest pitch I think I've ever achieved. Naturehike quote 5 minutes for a first-time pitch, though to be fair I didn't peg out the guylines so this is probably about right. Though instructions are included in the bag they are unnecessary. Simply peg out the four corners of the footprint, pop the ends of the double-Y-frame poles into the footprint eyelets, then clip the inner to the poles. The inner also has pole eyelets at the corners, which you can then pop the poles back through, and this also allows for pitching without the footprint. The fly then gets draped over the poles and clipped via a simple buckle system to tapes at the corners of the inner. If not using the guylines, pitching is completed by pegging out the front and back of the fly and the two doorways. 

Though billed as an inner-pitch-first tent, attaching the poles to the groundsheet first means you can actually put the fly over the poles before suspending the inner (albeit with a bit of contortionism), but of course you do have to do the latter with at least one door of the fly open, so if pitching in inclement weather the inner could still get wet. It does however give you the option to pitch without the inner if you just need to get some quick shelter from the rain.


Naturehike Mongar 2 two-person tent
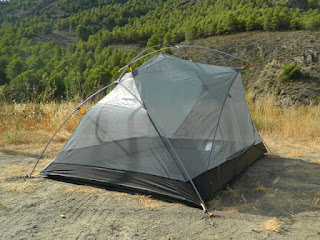
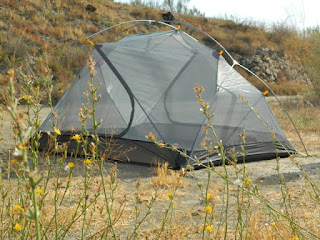
The free-standing, double-Y-frame design allows the tent to be pitched inner-only - great for some stargazing!


The Mongar 2 has an internal footprint of 210 x 135cm - for reference, that's the same width as a standard UK-spec double bed, so it's a comfortable size for two people. 210cm seems to be a common internal length for tents, and as I stand at 6'3" (190cm) it should be ample, however the several tents I've been in and/or owned at this length have generally seemed cramped, and I've usually found I've had to put myself on a slight angle to lay out properly because of the way the inner fabric tapers in towards the apex. Not so in this case; the lower end panels of the inner extend upwards more-or-less vertically, so I can comfortably use the full length of the tent. The pole system incorporates a crossbar which serves to hold the side walls in a near-vertical position too, making this the most capacious two person tent I have been in to date - two people can comfortably sit upright at the same time.

The tent boasts two side doors, and the entrances of the fly can either be fully opened or half-opened with toggles provided for holding all door panels (inner and fly) open. Inevitably one half of each fly opening will need pegging down to maintain the tent's shape when closed, but the fact that both sides can be left fully open during the day is a bonus in terms of access and ventilation. Speaking of - there is a vent at each of the tent as well. Once closed, the outer doors form two vestibules for gear storage, though (and this isn't uncommon) the footprint doesn't extend into these areas, so in wet weather your gear will still be sat on the bare ground. If used as a one-person tent however - and given the weight of the tent that's more than viable - there is ample room to get your gear inside with you.


Naturehike Mongar 2 tent
The Mongar 2 has a symmetrical design with two side doors, and on the flysheet these can be either half opened (as shown) or fully opened.


Inside the tent there are storage pouches at each end, plus a suspended (and detachable, should you want to shed a bit more weight) ceiling storage "shelf", plus a lamp hook.

In order to keep the weight down, the bulk of the Mongar 2 (groundsheet & flysheet) is constructed of 20D silicone-coated ripstop nylon with a hydrostatic head of 4000mm. All seams are taped and double-stitched, the stitching is consistent and even, and the whole tent has the feel of a quality product. Now it's rare to get rain in our part of Spain at this time of year, but out of nowhere, several hours after pitching up, a storm came over. So for once I can actually testify that it is, as you would expect, waterproof!


Naturehike Mongar 2 tent
The vents at each end should provide ample ventilation


20D nylon is of course quite thin (a necessary trade-off if you want to keep weight down while maintaining size/capacity), and while fine for the flysheet it does feel a little on the thin side for the groundsheet, though I don't see this being a problem when used in combination with the footprint. The poles are 7001 aluminium which flex nicely when erecting and don't ever feel like they are being forced into place.

The Mongar 2 has single-handedly replaced two of my other tents; lighter and yet massively more capacious than my current solo hiking tent, the Mongar also packs down smaller and has a more stable design than the former's tunnel shape. Likewise, for my two-person campsite trips, the Mongar's two-door design, bigger internal space thanks to the vertical walls, better waterproofing and considerably less weight and bulk than my existing tent means that has also been relegated to the spares pile.


Naturehike Mongar 2 tent, pitched inner only


I literally have nothing negative to say about this tent. Everything about it feels quality. Even the pegs - something which I normally have to replace straight away - are good quality Y-shape alloy pegs with cord loops for easy removal. It includes the footprint, which is a rare thing - normally the footprint is an excuse to squeeze a bit more money out of the customer. All these benefits should come at a cost, but in comparison to other options they don't in fact. Yes, if you were shopping purely for a campsite tent then there are cheaper - but probably not better - options available, but as a one/two-person hiking tent I just don't see how this can be beaten - not for this price and not without spending a considerable amount more. 

It isn't just lightweight, it's versatile; free-standing or fully guyed-out; it can be pitched inner only, flysheet only, inner first or, at push, fly first; it's lightweight enough to serve as a spacious one-person hiking tent, and spacious enough to use comfortably as a two-person tent. On top of all that, an additional vestibule is available to expand the tent further, giving additional shelter or gear storage.

While I can only make real-world comparisons to tents I've owned or used, I've done a lot of reading into and comparing other options, and in the sub-£200 price-bracket this should probably be your first choice. It gives many tents in the £200-£300 price-range a run for their money too. 


Naturehike Mongar 2


Monday, 2 August 2021

Camping in the Sierra de Castril Natural Park (Granada)

After our brief venture into the Sierra de Castril Natural Park on our day out in Castril (see here), I was very keen to get back there to camp and spend some time exploring the area. So, that's exactly what I did.

Janine and I loaded up the car and headed directly for the El Cortijillo campsite, where after booking in we discovered we could take the car directly onto the pitch which proved to be very handy indeed. The campsite was much bigger than I had realised on our first visit, and we picked a nice out-of-the-way spot at the far end of the site. The entire site sits under the shade of trees which was a blessing in the Spanish summer sun.


After pitching up we got our bearings of the site; an immaculate toilet & shower block with washing facilities; the bar and restaurant that I had briefly enjoyed on my previous visit and behind that a second bar and huge open-air, covered eating area. Beyond this was direct access to the river, and Janine was very quick to get in while I sat and watched from the bank - I wasn't quite ready to get in a freezing cold river!

Afterwards we decided to have a bit of a meander along the river in the direction of the reservoir. My original plan had been to walk alongside the river but we quickly realised this wasn't much of an option due to the terrain, so we walked along the road until we found a suitable spot to access the river, and having done so spent a good hour paddling and splashing about. It was cold, but after about ten minutes of adjusting to the temperature (me, not Janine - she launched herself straight in!) I plonked myself down and sat there quite happily, totally relaxed as I took in the beautiful surroundings and emptied my head of the stresses of day-to-day life.


Eventually we decided to head back to camp, where we chilled by the tents over some (rather warm) Tinto de Verano that we had brought with us, before heading up to the bar for the evening. We had planned on ordering food (incidentally, the bar is happy to provide food and drinks to take back to your pitch), but being in Granada the tapas was in ready supply, so we picked away at that all evening instead. I can only imagine the food is very good though - despite the campsite being fairly quiet, the outdoor eating area was packed at lunchtime; evidently people travel from far and wide to eat here.

The plan for day two was to hike down to the reservoir - an hour's walk according to google - so again we headed down the road, following the river. It's an easy and self-explanatory walk - no map required - and indeed an hour later we found ourselves at the reservoir's edge (passing, along the way, many Spanish families enjoying a Sunday out under the trees by the river, accompanied by their full kitchen and garden-furniture set up. It's a genuinely lovely sight to see).


Actually getting into the reservoir to a point where it was deep enough to swim was a much more tricky affair, and one that eventually proved fruitless. We criss-crossed along the ever-widening river, before doing some hill scrambling along animal paths to try and find a suitable access point, but to no avail; the banks were a lot steeper than the view from above leads you to believe, and while we may indeed have managed to get in for a swim there was a real danger we may not have been able to climb back out, so eventually we retraced our steps and plonked ourselves back in the river again, while also replenishing our water supplies.


The hike back to camp was an altogether more challenging affair than the outward trek, being as we were now at the peak of the midday heat, and within half an hour our ice-cold water had passed being warm and was on the brink of being hot; it was a joyous sight indeed when we came upon the old dam that signalled we were almost back at camp. The first port of call was the bar for some much-needed refreshment. 

The second evening mirrored the first, as we whiled away the hours over beer and tapas. Normally I'm quite keen to get packed up and off on leaving day, but neither of us were in any particular rush to vacate our idyllic little spot in the country, so we sat for several more hours outside the tents absorbing the views and the sounds of birds and the running river.

Camping El Cortijillo

Sierra de Castril Natural Park (more info)


Thursday, 8 July 2021

A day out in Castril, Granada

There's been many things that have stopped me getting out and about since we moved to Spain, but if I'm being honest with myself I think one of the biggest factors is that I now live in the countryside, up a mountain. As such, the urgency to escape to the country had been quashed somewhat, being as I am already technically there. But having finally got a night's wild-camping in recently, and with a renewed desire to go off exploring, I decided to do something that I'd wanted to do for a few years and never got round to; the Castril gorge walk, or El Sendero de la Cerrada del Rio Castril to give it its proper name. 


Castril is situated in the north of Granada province, close to the border with Jaen, and south of the Sierra de Castril Natural Park, with the hamlet itself being recognised as a place of historic interest. There is plenty to see and do around Castril, and its several campsites offer a great base to do this (more on that later). There is a tourist centre which seemed like a sensible place to start, but in true Spanish fashion it was closed when we got there. The map in the window told us that there were several hiking trails (of varying lengths) around and along the river, though it wasn't particularly clear where they started or where we were in relation to anything, but a quick phone call to a friend who'd done the gorge walk several times put us on the right track and not five minutes later we were parked up at the right place and ready to go.


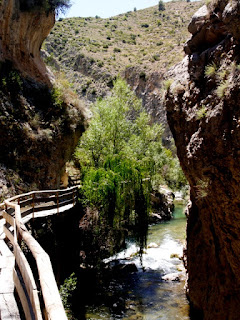
We decided to eat our packed lunch first as it was gone 1pm by this time, and the start of the walk offered a large shaded area under the trees with plenty of bench seats in which to do so. The walk follows the river through a gorge, and starts off with a wooden walkway slung from the rock face. Eventually this walkway finishes and you're back on terra firma, descending to ground level. The water was crystal clear and very inviting on a hot July day. The path then climbs again to take you to a suspended steel bridge - not much fun for vertigo sufferers, as my wife demonstrated - taking you across the river to a tunnel cut through the rock. Once out of the tunnel you are met by a waterfall, before descending once more and crossing the river for a second time via another bridge (a solid one this time, much to the wife's relief). 


A wooden walkway through the gorge of the Castril river


Just around the corner is an old mill which now serves as a bar, restaurant and hotel. From this point you have two options - turn back or continue along to do a full loop. We started on the latter, but as we quickly diverged from the river and lost the shade of the trees the sun started to take its toll on my wife, so we decided to double-back after all, stopping for a quick drink at the mill along the way. 


I was surprised at just how short the gorge walk actually was and it wasn't long before we were back at the car. My plan had been to have a wander round the town and stop in a few bars, but having seen a sign for a campsite near by the wife decided she wanted to go and view it, and having done so the next thing I knew we were passing the visitors centre once more and heading out of town. After about 5-10 minutes drive we came across another campsite sign, and with the wife at the wheel we were again heading off course to investigate.

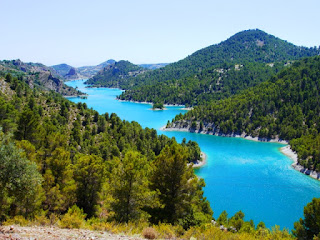
This time I'm glad we did; the road appeared to end, to be replaced by a dirt track (it didn't, as it turns out), so the wife parked the car and I got out to see what was what. Upon rounding the next corner I was presented with the most stunning of views; a vast reservoir - evidently what the Castril dam was holding back - and I realised we were now in the Sierra de Castril Natural Park. The water was bluer than the sky (on what was a cloudless sunny day), and with every few meters that I walked, a bit more of it was revealed.


Sierra de Castril Natural Park Reservoir
El Portillo reservoir in the Sierra de Castril Natural Park


After wandering around for ten minutes or so taking photos, we got back in the car and continued in search of the campsite. The road descended down into the valley then twisted and turned through beautiful countryside, following the river throughout, until about 7km later we were at the camp. Going by the name of El Cortijillo Castril, and equipped with a lovely bar and restaurant, the campsite is a good size and appears to have great facilities (including, if tenting isn't your thing, bungalows and cabins), and would make an excellent base for exploration of the mountains and lakes of the Natural Park - or even just a holiday doing very little but relaxing in a peaceful environment. And I really can't overstate what a beautiful location this is.

This is the great thing about getting out and about - you never know what you'll stumble upon next, and I actually can't wait to get back there now, pitch up and get exploring.


Castril - More Info (Andalusia Tourist Board)

Sierra de Castril Natural Park (Andalusia Tourist Board)

El Cortijillo Castril Campsite


Saturday, 3 July 2021

Trangoworld Skin Micro Lite vs Therm-a-rest Prolite Self-Inflating Mats

Therm-a-rest proudly state that their Prolite self-inflating mat is "the lightest and most compact self-inflating mat available" - only it isn't. Well it is and it isn't......

Their small version (119 x 51cm) only beats the equivalent-sized Trangoworld Skin Micro Lite (120 x 50cm) to this title by a mere 20g* but it does so at the expense of performance - the Skin Micro Lite is 20% thicker than the Prolite, and consequently sports a higher R-value (thermal insulation rating) - 3.41 compared to the 2.4 of the Therm-a-rest. So it may be the lightest - but only just, and not in a good way.

Neither is the Prolite the "most compact" (assuming that they mean "when packed" here) - the Skin Micro Lite packs up smaller than the Prolite. Admittedly it's close, with only about 1cm in it, but remember the Skin Micro Lite is 20% thicker so the points for achievement go to Trangoworld. 

Trangoworld Skin Micro Lite self-inflating sleeping mat
Photo courtesy of Trangoworld


Now I'm quite the gram-counter, but on this occasion I can forgive the extra weight. And it's not just the weight of the mat I'm talking about - it's also the weight of the extra cash in my wallet; the Prolite costs three times as much as the Skin Micro Lite. Seriously, who's buying the Prolite?

I'm not going to do a full review of the small Skin Micro Lite as I pretty much covered everything in my review of the regular version (see here). But as I mentioned in my recent update of that review, it's amazing that more than half a decade later, the Trangoworld is still the mat to beat - and no-one is coming close. 

Anyone can make something lighter by cutting the amount of materials in it (and consequently cutting performance and comfort), but the fact that Trangoworld have made the second-lightest mat (with the difference in weight being less than that of an AA battery) without sacrificing comfort and performance is pretty outstanding. Oh, and did I mention it was a third of the price? Incredible...

What's even more incredible is you'll never see it appear on any lists of best/lightest mats. It's almost as if the world doesn't want you to know it exists.


Trangoworld Skin Micro Lite 120x50x3


*Based on manufacturers' advertised weights. Likewise, the regular version of the Skin Micro Lite is only 40g heavier than the Prolite, but boasts the same increase in thickness and R-value as seen with the small versions. My own Skin Micro Lite actually weighed in at 392g (406g in its stuff sack), a seemingly common issue with self-inflating mats; weights seem to vary tremendously and it appears that manufacturers state the average weight. Oddly, I've never managed to come across one that weighs less than the figure advertised.


Monday, 28 June 2021

Review: Outwell Cloud 2 Tent

I bought my Outwell Cloud 2 tent about five years ago now, primarily as a solo tent for occasions when I was using campsites as a base for hiking (so, where weight wasn't an issue), but also for one-to-two night camps with the wife where it isn't worth setting up the big tent.

It serves both purposes admirably; as two-man tents go it's pretty roomy, with an inner floor area of 140 x 210cm, so you don't feel too cramped up next to your sleeping partner. As a solo tent you've got more room than enough and can easily fit all your gear inside with you. The 210cm length is only marginally too short for my 6'3" frame (it probably isn't too short but I like to lay with my head away from the top end a little bit), but I can stretch out nicely if I lay on a slight angle, which the generous width easily facilitates.


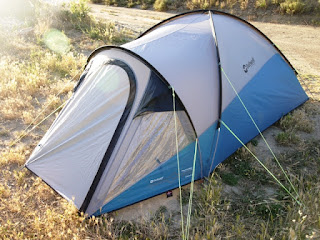
Outwell Cloud 2 two-person dome tent


The tent is very quick and easy to pitch, and while Outwell say it's a two-man job I've done it on my own without much of a struggle.  

The tent features a front porch which provides ample space for a couple of rucksacks (I've had two 65l bags in there with plenty of room to spare) while still allowing easy access, and the groundsheet of this is separate, making it optional if you do want to shed a bit of weight and also makes cleaning very easy after you've thrown your muddy boots in there. 

Once the fly is pitched, hanging the inner is a two-minute job (this can also be left attached and pitched as one) and there's plenty of space between inner and fly to prevent the two touching, and I have had no condensation issues at all since owning it. If pitched as one, I reckon pitch time is no more than five minutes.


Outwell Cloud 2 two-person dome tent


There's a lot of nice little details to the Cloud; mesh pole channels allow the wind to pass through rather than buffeting the main support structure; the bathtub porch has a fold-flat front to make access easy, and then folds back up and toggles to the main door from inside when closed; inner storage pockets; roll-back curtains. It manages to offer more internal room than many two-man tents while still maintaining a fairly compact footprint. 

Outwell make the Cloud in three and five-man variants as well, and as they all share the same design presumably they all take the same time to pitch - a five-man tent with a five-minute pitch time is quite impressive. The Cloud 2 is the most generous in terms of space-per-person, however, offering 70cm of width per-person as opposed to 60cm per-person in the Cloud 3 & 5.

At 4.5kg it's certainly no lightweight - in fact it's downright heavy, and there are certainly lighter (and cheaper) options available - but it's manageable if divided across two packs and roughly the equivalent of carrying two average one-man tents*, which, thanks to the reasonable internal space, is definitely a viable option. With that said, I don't think this would ever be anyone's first choice as a hiking tent and it's definitely more suited to campsite camping, which in fairness to Outwell is where they market themselves.

From what I've seen of Outwell tents they've always been well made and well thought out, and the Cloud 2 doesn't disappoint, though in a crowded market its heavy weight and relatively high price point set it apart from the competition for all the wrong reasons, and while it's a solid tent it wouldn't be my first choice if I was shopping for something similar today.

Outwell Cloud 2


*As mentioned before, when I talk about one-man tents I'm generally referring to tent's like the Vango Banshee 200, Wild Country Zephyros 2, etc, which although sold as two-man tents are really only big enough for one.


Thursday, 24 June 2021

Review: Jetboil Zip + 1.5l FluxRing Ceramic Cook Pot

Preface:

I do love my spirit stove, there's no denying that. But I recently got to thinking that I would be better running it on gas, not so much from an efficiency point of view but from a safety aspect - even when the fire bans aren't in place here everything it still pretty dry, and one overzealous movement could result in burning fuel pouring over dry pine needles and the like. I'm definitely a "better safe than sorry" kind of guy.

Anyway, if you've read the review of my spirit stove (see here) you'll know it's a sort of Trangia / Optimus clone that takes a Trangia burner and so any Trangia-compatible gas burner should fit. However, they're few and far between; the choices seem to be limited to the genuine Trangia version, the Robens Fire Tick (which may or may not be discontinued - it's certainly out of stock everywhere I looked) or any number of no-name variants on Aliexpress.

With neither the patience to wait for the Robens to come back in stock nor the justification for spending 50% more again on the Trangia version, I started to look at other options......


Review:

When I reviewed my Alpkit BruKit some years ago I mentioned that I had been prompted into buying it after my Jetboil Zip never arrived. Well, having decided that the BruKit wasn't best-suited to my needs, I sold it on to Bob, and eventually bought the Jetboil. It's had more use than I ever thought it would - and not just for camping. It's my go-to water boiler when we have a power cut and it came in our hand luggage when we emigrated and was our main cooking source until we I put the new kitchen in.


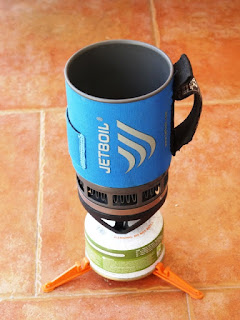
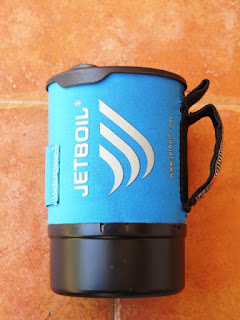
Jetboil Zip cook system

As with the BruKit, cooking isn't its forte, but we managed. These kind of stoves are designed primarily for rapid water boiling, and at that they excel, but the pot height and diameter makes cooking with it a bit more challenging. Unlike the larger BruKit, the Zip's compact 0.8l pot also rules out boil-in-the-bag cooking. So in the main the Jetboil has been used for making a brew (and has accompanied me on many a day out) or boiling up water for instant noodles.

Jetboil Zip compact system
The burner, gas and stabiliser pack into the pot, while the cup sits underneath


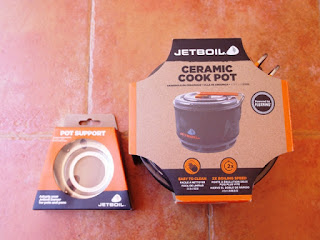
Until now, that is, when I discovered that Jetboil make a pot support to take pretty much any stand-alone pot or pan. Again, sourcing one was a challenge. I think I managed to find about the only place in Spain that still had stock, and promptly ordered one up along with the matching Jetboil 1.5l cooking pot.


Jetboil pot support & 1.5l FluxRing cook pot

The Jetboil Zip is the most compact of the Jetboil stoves, with it's 0.8l capacity pot. Out-of-the-box it comes with the burner, pot with neoprene sleeve, stabiliser support, lid and bottom cover. The cover doubles as a bowl/cup and the lid has both a pouring spout (which can also be used to drink from) and strainer holes. The burner, stabiliser and gas (100g) pack away neatly inside the pot for transport/storage. It runs on any EN417 butane/propane gas cartridge, but while the stabiliser will accept 100g and 230g cartridges only the former can be packed away into the pot. There is no piezo ignition on this model, so it has to be lit with a match/cigarette lighter.

The Jetboil boils water fast. There may be faster stoves out there, but at 2 minutes 30 seconds for half a litre it's no slow coach. As I tend to only boil a mugs-worth at a time, it comes in even quicker. This is thanks in part to the built-in heat exchanger, or FluxRing as Jetboil call it - a feature present throughout Jetboil's range. A coffee-press attachment is also available to turn the Zip into a cafetiere.

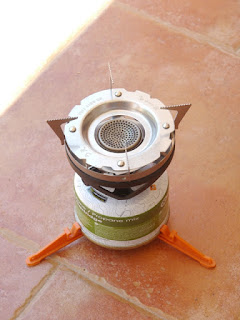
The optional pot stand locks securely to the burner in place of the standard pot, and allows use of the Jetboil cookpot, frying pan or other third-party pots (Jetboil say not to use pots with a diameter greater than 23cm or a capacity greater than 2l).

Jetboil Zip with pot support
The Zip burner with pot stand fitted


While the Jetboil Zip is a great piece of kit, the cook pot is a massive disappointment. For a start off, the price is extortionate for what it is, even if it was designed and built well - which it isn't. The lid is ill-fitting with a good 5mm of lateral play, and though one can only assume this is by design, I've no idea why - it isn't to let steam escape, because the lid has strainer holes in it.
The handle, while serviceable, is underwhelming for a product at this price point (I've seen far better designs on products costing a quarter of the price), and it's also in the wrong place - it sits below the half-way mark then angles back upwards, which serves to make the pot top-heavy when handling and downright awkward to hold when eating directly from the pot. On top of that, it isn't even fitted straight - the bracket is riveted to the pot off-centre, and the bracket itself isn't square either, so the whole handle is on a twist.

Though obviously intended to be used with the pan support, it's no more secure in place than any other pot. It does have a slight lip around the bottom to (in theory) prevent it sliding off the stand, but this has rounded edges and is so shallow that it doesn't actually achieve anything (one of the reasons I opted for the Jetboil pot over a third-party one was that I assumed it would be designed for purpose and thus a better and more secure fit). I certainly wasn't comfortable stirring my food without keeping a firm grip on the handle. 

If I was to sum it up, it has the feel of an existing OEM product that has had the Jetboil name slapped on it rather than something that was designed from scratch to integrate with the Jetboil system.


At 1.5l, the Jetboil cook pot is way too big for a single person and more than ample for two (in fact you can probably fit the contents of five packets of Wayfayrer food in it) - 1.2l to 1.3l is plenty big enough for two people, so this pot is better suited to group cooking. The latest version features a non-stick ceramic coating, which while nice in principle does mean extra care has to be taken when packing the gas, burner, etc into it to avoid scratching the coating. Basically you're going to have to find a suitable bag to put them in first. This also limits you to using plastic utensils for the same reason.

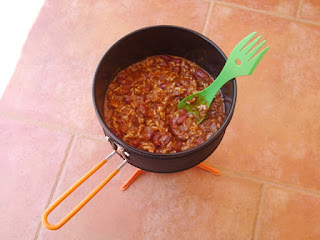
Cooking with the Jetboil FluxRing 1.5l cook pot
A 400g can of chilli and 125g pre-cooked rice just disappear in the 1.5l pot


On the plus side, the included pot lid is transparent so you can keep an eye on your food without having to lift the lid and let heat escape, which is a nice touch though hardly a unique feature. The non-stick coating does its job, and food does heat up/cook very fast. My obligatory chilli con carne was cooked in a matter of minutes. I have yet to test a conventional third-party pot to see how much difference the FluxRing makes, but Jetboil claim 2x faster boil times and from my experience of using the Zip pot I'm inclined to agree.


If you were setting out to buy a Jetboil for cooking on, the better option in my opinion would be the MiniMo; its 1l pot is more suitable for single-person use and less bulky, as a system it weighs less than the Zip burner & 1.5l pot combination, and it works out roughly the same price. It's also worth mentioning that pretty much every Jetboil component is available as a spare part, so if you particularly wanted this set up the cheapest option would be to buy the Zip burner, stabiliser, pot stand and 1.5l pot individually. 

As it is, I now have a flexible system that can cover a multitude of options, from day-trip coffee making to two-to-four-person camp cooking - though it's unlikely I'd take the pot on solo trips due to its size. 

In conclusion, the Zip is an outstanding bit of kit (even more so with the added flexibility that the pot support provides) and an almost must-have, while conversely I honestly wouldn't recommend the pot at all on the basis that the design and quality is poor (especially for the price) and there is no shortage of alternatives. 


NOTE: I sent Jetboil a link to this review as I was interested to hear their thoughts on my observations and comments regarding the cook pot, and did eventually have a conversation with them, but ultimately their customer service turned out to be as good as the pot I was complaining about.


Tuesday, 15 June 2021

Review: Stanley All-In-One Food Jar (First Impressions)

With the Summer fire bans now in place in Spain I've been pondering ways in which I can still have a good meal while out and about without falling foul of the law and/or risking setting the countryside on fire.

While it could be reasoned that the semi-concealed nature of my Jetboil Zip's flame means it doesn't constitute an "open flame" - and indeed it seems other countries do allow the use of such stoves during fire bans - I decided I didn't want to take the gamble on it being OK. So I started looking into flameless cook systems, but of the few I found to exist, most had been discontinued without replacement which made me question their effectiveness and/or safety. This left me at somewhat of a dead end. Then I realised maybe I was over-thinking the issue.

As I tend to only do over-night camps due to time constraints, I started wondering whether I even need to cook at all. I mean nothing beats the simple pleasure of cooking up a meal in the wilderness, but how essential is it on a one-night stay? Not essential at all, I reasoned, so I started looking at vacuum food jars (basically vacuum flasks but shorter and wider, specifically designed for storing and consuming food from).

There are several reputable offerings, all in a similar price range, from the likes of Thermos, Esbit and Stanley, and even more offerings from some lesser-known brands. I decided to stick to a big name on this and even then it was a tough decision - there are almost too many different options:

Stanley do several different sizes, including a 400ml and 530ml version (both including a spork); Thermos do two models that fit between the two Stanley offerings in terms of size, at 470ml (which is cheaper and only marginally heavier (40g) than the smaller Stanley model), and 500ml (at the same weight as the Stanley but more expensive), both including a spork. Esbit do a 750ml model at around the same weight (and price) as the larger Stanley model, and then Thermos do a 710ml version which at 400g weighs in considerably less than both the Esbit and the larger Stanley, but neither include a spork. In fact it was so difficult to chose that in an ideal world I would have bought one of each.

I decided the 400ml Stanley was too small, given that it would hold a can of chilli but nothing else (i.e. no rice), and I thought the 470ml Thermos might also be a bit on the small size for the same reason. Initially the Esbit, with an extra 50% capacity yet same overall weight as the larger Stanley, or the lighter but more capacious 710ml Thermos seemed to be the most viable options, but then I reasoned that unless I filled them, they would be less effective at doing their job of keeping the food warm; with that said I'm strongly considering purchasing one of these at a later date for when the wife and I next camp, as at that size it will hold enough food for two - albeit slightly smaller - portions. Ultimately, the 530ml Stanley seemed to be the ideal compromise between capacity and weight.

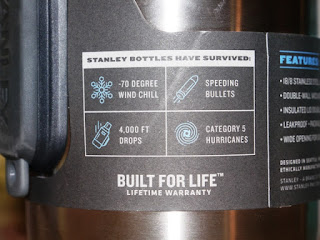
The Stanley jar arrived with virtually no packaging of it's own (a good thing), save for a cardboard wrap upon which it mentions that Stanley flasks have survived speeding bullets, 4000-foot drops, etc; not Amazon's couriers though, being as it arrived with a massive dent in the lid. I have that many problems with Amazon deliveries that I decided just to keep it, rather than mess around with a replacement - given that it's the lid rather than the flask that is dented it shouldn't effect functionality. 


Stanley All-In-One Food Jar

Bulletproof......

Stanley All-In-One Food Jar

....but not Amazon/courier proof.


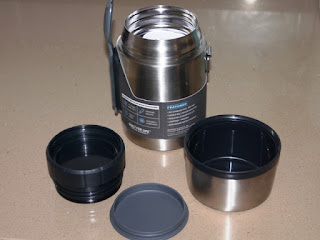
As the product name suggests, it really is an all-in-one system; the lid, as anyone who's ever owned a flask will know, acts as a bowl. In this case it is a stainless steel outer with a plastic liner, giving an element of insulation to prevent burnt hands. With that said, the mouth of the jar is wide enough to eat straight out of and it's more likely I will use the lid as a cup, if at all.

The top of the stopper has it's own little compartment with lid to store - well, I'm not sure what you would put in there, but it's there anyway. Attached to the side of the jar is a spork holder and spork. I intended to replace the included spork with my titanium Sea To Summit version on the presumption that the latter would be lighter, but it actually isn't. And just as well, because it doesn't fit the holder. 


Stanley All-In-One Food Jar


Despite the courier's best efforts, the jar does feel solid and built-to-last and it's easy to see why Stanley offer a lifetime warranty. With no other brand's offering's to hand I can't make comparisons, but I have absolutely no complaints from a build perspective.

At 520g, the jar comes in a shade under the weight of my Jetboil plus gas canister, and weighs less than my spirit stove excluding fuel. So for a single-person, single-night trip it actually makes more sense to take the jar unless I was using dehydrated food and near a water source* (in which case the Jetboil would become the lighter option overall), and it also presents other benefits; if for whatever reason you found yourself unable to cook (bad weather, as one example), with this you've already got your cooked meal, ready to eat. I'm amazed it's taken me this long to think about it to be honest.

With that said, there is of course one major down-side; food will only stay hot for so long. Stanley claim 12 hours, though some real-world reviews disagree. I've yet to test this out - if the food is still hot after 12 hours then there is no issue for one-night trips. If, in fact, it starts to get cold after 6 hours, that could be a problem. Time will tell on that front, and I'll be sure to report back with my findings.  

Stanley All-In-One Food Jar


*The dry weight of dehydrated food plus the weight of the water needed to activate it is generally more than the food weight of a can of chilli, soup, etc; dehydrated food is really only meant for long trips where a lot of food needs to be carried and access to water is plentiful - there's certainly no argument for using dehydrated food on one or two-night trips. 


Sunday, 13 June 2021

Review: Tesco 65L Rucksack

Preface:

I originally wrote this review in 2015 but never published it. While I now have the advantage of having used this bag for many years and can testify to its build quality and longevity, it's unfortunately somewhat irrelevant now as - from what I can gather - it has long being discontinued and without replacement. Indeed, even several years ago they had discontinued this model and replaced it with a not-quite-so-good alternative (the quality was still there, but there were evident cost-saving changes to the design, and removal of certain features - though even then it was still a great bag for the money). 

However, six years on I have decided to publish the review as it still holds true as an example that higher price / big brand name doesn't always equal better. I've replaced a lot of my equipment over the years for better / lighter alternatives, but this £15 rucksack is still my go-to bag and I expect to get many years use out of it yet.


Original Review:

Terra Nova, Trangoworld, Snugpak, Jetboil, Force Ten; just a few of the more well-known names adorning some of my kit. And what do I keep all this kit in? A £15 rucksack from Tesco.

I can already see the look of dismay and disgust on the faces of die-hard gear enthusiasts and brand fan-boys alike. Cries of "It'll fall apart!" "It'll be made from rubbish materials!" and "This guy hasn't got a clue what he's talking about!" are echoing around houses up and down the country.

In response, I've learned two things over the years; One- that in this day and age, a brand name and higher price tag don't in any way guarantee a product's quality and longevity. Unfortunately there are too few products still made in former manufacturing powerhouses like the UK, USA and Germany; most companies farm their production out to the Far East, where your £200 rucksack is likely to be made on the floor above the £20 rucksacks in the same factory. While a product may be designed on Western soil, the design is only as good as its execution. And even the best manufacturer has an off day.

And Two- the more someone spends on a product, the more they will try and justify their expense by slating anything cheaper than it, even if the cheaper product does the job just as well or better.

And so, if you can bring yourselves to read why the Tesco rucksack is my bag of choice, here is the review:

When Bob and I first decided to go camping, I really didn't know what I was getting into. I certainly didn't realise how much gear I needed to buy, and how much of an expense it would be, and as such my budget was very tight. So I was rather chuffed - having accepted the 25L rucksack in the loft was nowhere near big enough for everything I needed to take- when I walked into Tesco and saw they had a 65L (actually, 65L + 10L- it came with a detachable 10L daysack) in the sale for around £15.

The rucksack is from their own-brand camping gear range, which seems to have been slimmed-down tremendously over the last few years, but doesn't feature the Tesco name on it, rather a non-descript logo.

The bag has an adjustable back system, as you'd expect from any decent rucksack of this size, and both the back and waist straps are very well padded and of a breathable construction.

The main compartment and lower compartment have a zipped divider, allowing you to open this up to provide one big space. At the top of the main compartment is an extending cover to allow over-filling, so really there's more space than enough in here, and it also has a section for a water bladder, with the obligatory opening to allow the tube to pass through.

You then have a top (head) compartment, which will comfortably fit a Trangia 27 stove, and on the sides two elongated, zipped compartments with load-balancing compression straps, and two elasticated mesh pockets.

The outside of the bag doesn't disappoint either, with plenty of molle-type attachments points, a central elasticated lashing that will easily take a roll mat or slim tent, and lower straps to sling a tent/mat/dry bag from.

The pack comes with a rain cover, stored in its own compartment at the bottom of the bag, and this compartment thankfully has enough room to store an additional after-market rain cover if you find, as I did, that the inbuilt one wasn't big enough when you've got a load of stuff hanging off your bag.

In short, this has all the space, organisation and features that you could ask for and would expect of any decent rucksack.

Its made from 600D ripstop polyester rather than nylon, which I've seen many people count as a downside in other "budget" bags, but polyester isn't a bad material. It also weighs in at only 1.7kg- try and find another sub-£100 bag of this size that weighs less; I haven't been able to, which is part of the reason I've never replaced this pack.

The stitching seems solid throughout and overall the pack appears well made, and after several outings in the field I have no doubts about its durability and the pack is comfortable in use.

Of course, there are better bags out there, but for the money this is a very good pack, and this comes back to my philosophy of buying the best I can justify; I haven't seen a rucksack under £100 that I could say justifies the extra expense over Tesco's offering.

So while I have no doubt that people will continue to go out and drop infinitely more money on brand-named rucksacks, I would say go and take a small gamble on this pack; I did, and I was that impressed that not only is it the one item in my kit that I've never replaced, I've also bought a spare. 


Where has the time gone?

It's hard to believe it's been 6 years since we've updated this blog. 

A lot has happened in the time - I moved to Spain and Bob grew a massive beard. For various reasons - being extremely busy, actually living in the countryside now and not having my upside-down-headed camping partner here with me to name but a few - I haven't really been into the wilds much despite a wealth of places to explore. 

In regards to the latter, however, I now have a Bob-alternative in the form of the full-head-of-hair sporting Janine, and after a year of procrastinating we finally got out for our first over-nighter a week ago. We didn't travel too far, so as to break ourselves back in gently, and I didn't get any photos unfortunately so I won't be doing a blog post on the trip, but I'm now back in the groove as it were and hopefully it will be the first of many.

Being in Spain has its own set of pros and cons; the (generally) reliable weather allows for travelling light, but the summer fire ban presents its own hurdles in relation to cooking, so I'm currently working on solutions to that - which will inevitably involve new gear and a re-think on my pack. The plus side to that is I'll be able to post some more gear reviews soon.

I'm very much looking forward to many a trip from here on in, and a resurrection of this most excellent blog!