Thursday, 3 September 2015

Review: Quechua Forclaz A100 Self-Inflating Mat

When I decided to put together an ultralight kit, every gram became an issue. Although I already had a sleeping mat that could be considered ultralight, the fact that it was full length meant that there were weight savings to be made. The obvious choice for a 3/4 length mat was the 3/4 length version of the Trangoworld Skin Microlite, but unfortunately while waiting for the retailer to verify the weight, they whacked the price up beyond what I was prepared to pay. So, I went hunting......

After my usual extensive research, I settled on the Quechua Forclaz A100.

Decathlon Quechua A100 self-inflating sleeping mat
Photo courtesy of Quechua

The A100 self-inflating mat is a 3/4 length mat measuring 117 x 50cm, and with an advertised weight of 380g according to its stuff sack and 400g according to Quechua's website (mine actually weighed well over 400g, but whats new?), its probably the lightest self-inflating mat in this price range. Unfortunately, this diminutive weight isn't so much an achievement of technology and design as simply cutting back on materials- the A100 is only 20mm thick, making it one of the thinnest (if not the thinnest) self-inflating mats available. In addition, no R-value is given and I would expect the reduction in thickness to consequently give a reduction in R-value.

In use, the Quechua does self-inflate to some degree, but as is to be expected a few good blows are required to help it up. Despite its meager 20mm of loft, I have to say I didn't notice any discernible difference between this and my 30mm mat, and I personally found it much more comfortable than my 80mm air mattress, so don't let its thickness (or should that be thinness?) put you off.
Its thinner proportions also help mitigate the fact that its only a 3/4 length- you simply don't notice the drop where you legs hang off the end.

It was a pretty cold night when I tested the A100, despite being the middle of summer, but the mat and a one-season sleeping bag kept me nice and cozy. That said, I would generally revert back to my full-length mat for the colder months.

The outer material is typical of most self inflating mats, and while not particularly anti-slip, I didn't find myself sliding off it at all.

The mat packs away into its stuff sack without a fight, which is always a refreshing change, and down to a pretty compact size.

So is this the best budget self-inflating 3/4 length mattress? That's hard to say.
At the A100's sub-£25 price point, there is nothing to touch it in terms of cost-to-weight-to-comfort ratio, and if that is where your budget stops then this is the mat for you.
But for very little extra outlay, the Trangoworld Skin Micro Lite is 30mm longer, 50% thicker and 30g lighter, not to mention the extra technologies it incorporates such as its anti-slip covering - plus you know what you're getting in terms of thermal insulation because they state the R-value. So in that respect, the Trangoworld remains the one to beat, though the Quechua is still a cut above the rest.

2021 UPDATE: At some point in the last few years this got discontinued and Decathlon haven't produced an alternative. So, the Trangoworld is still the number one choice in this price bracket, and indeed many price brackets above.


Quechua Forclaz A100

Trangoworld Skin Micro Lite


Saturday, 15 August 2015

Howden Reservoir In The Sunshine


My brother loves a good hike. He also loves to climb a mountain, and throw himself off them. Unfortunately he lives 240 miles away, so rare are the opportunities for us to get out together. This weekend he was down this way, so we jumped at the chance to head outdoors.

After two days of dreary weather (though not, thankfully, the rains of Biblical-proportions that the media had threatened), we awoke to glorious sunshine. I had had two routes in mind- either Burbage or Howden Res. With my brother being a seasoned hiker, I thought the Burbage route might be too short to satisfy, so we opted for the latter.


I was sweating before I'd left the house (despite being clad in shorts and t-shirt), and the only cloud in the sky on our drive to Derwent was typically the one hanging right over our destination, so after previously poking fun at Phil for his "inappropriate" attire of full-length trousers and a long-sleeved top, I was eating my words as we got out of the car to the first drops of rain and rather cool breeze.

A bit of cold and rain wouldn't stop us though, and we were at the second dam in no time, at which point Phil lost his bearings and became convinced we were now on the other side of the reservoir and on the return leg. He couldn't have been more wrong- this was only the beginning. The wife will be thankful that we didn't carry on any further than this on our trip here a few weeks ago; from this viewpoint the trail is deceiving, and leads you to believe that the opposite side of the dam is only a couple of miles walk away.


In fact, the route twists and turns for about another eight miles, taking you through some beautiful countryside along the way. I commented in my last post that Howden felt a lot more open and natural than Ladybower, but then I didn't know the half of it. The landscape is sprawling, and access to it is unrestricted in the main.

Phil spotted a hill he wanted to climb, and after initially dismissing the idea we found a footpath that seemed to lead upwards. Ten minutes later we were at the summit, and our reward was the best views and complete peace and quiet; the perfect place to have lunch. By this time the sun had made good on its promise and we spent a good half-an-hour just laying around doing nothing.


Once back down- which as usual was harder than going up- we carried on the beaten track. The paths are solid and well-maintained, and in fact they appear to see far more use from cyclists than from hikers who, if anything, seem to head for the hills.

As I said, the route is very deceiving and just as you think you are about to turn a corner into the homeward stretch, you veer off in the other direction entirely. This air of unpredictability adds a certain pleasure to what one may (wrongly) assume might have been a rather dull walk. It is in fact anything but, with plenty of beautiful views to take in and many a side-route to hop on if you feel like having an explore.


When we finally got back to the visitors centre some twelve miles later, we had no doubt that we had earned the pie and peas on offer at the snack bar there, and devoured them with that sense of reward that comes from a good physical slog.


This won't be my last trip to Howden Reservoir. Its just a shame that the wife's knees aren't up to the whole route, as by turning back at the second dam as we did previously, you definitely miss the best of what the reservoir has to offer.


Wednesday, 5 August 2015

A Brief Visit to Bamford, Bradwell, Castleton, Hathersage & Howden Res


With differing work patterns making mutual time-off difficult, the wife and I managed to get a brief one-night camp out in the Derbyshire countryside last weekend, but we still managed to pack a bit in.

It was the perfect time to trial our "back-up" tent, the Vango 200+, which we bought around Christmas time but up until now hadn't had the opportunity to erect, let alone spend the night in.


Our pitch for the night was at Swallowholme campsite in Bamford, a nice little campsite predominantly accommodating caravans and motor homes, but with a separate area for tents. Our hosts were very friendly and informative and the facilities were both modern and immaculate.

After pegging out the tarps, an inquisitive duck waddled over, pecked at the tarps, then had a shit on them.


The tent was a swine to put up, helped largely by a knackered pole. An easy fix back at home with some tools, but not so much fun out in the field, so to speak. Our plan had been to pitch up then head off around Howden reservoir, but as it was threatening rain we decided to postpone our walk until the following day and explore some of the local villages instead. Upon advice from our hosts, we headed off to Bradwell for their annual carnival.....


The Bradwell carnival was a nice, low-tech affair. It certainly brought out the crowds and there was a real sense of community spirit that not even the rain could dampen, which has all-but vanished from town-life. We had a pint and a chip butty and watched the floats and brass band go by, after which there was little else to do, so we decided to head round the corner to Castleton.


Castleton looked lovely as we drove through, with plenty of nice looking pubs. We saw the sign for Peveril castle and headed for it. Unfortunately, after a further twenty minutes of driving and still no castle, we started to think we might have made a mistake. We had indeed; the castle was about three yards from the sign, and we were now six-and-a-half miles beyond our campsite in the wrong direction. Ace......

Having decided not to go all the way back around to Castleton, we then had a drive to Hathersage, where we had another pint and a waffle in the Hathersage Social Club, which despite its pub pretensions is actually a cafe with an alcohol licence. But they serve a nice waffle and the service was excellent.


From there we went back to the campsite for a hard-earned nap, then on to a local pub for tea, which I won't name because the food was crap.

Back in the tent, the rain started coming down good and proper. This didn't put off the rowdy sods in the tent next-door, who had either never been camping before or had never been taken-to-task for disturbing others. The tent proved to be waterproof, but unfortunately it wasn't gobsh*te proof.


The next morning we awoke to stiff necks and the tutterings of the bloke in the next tent who apparently also wasn't too thrilled about the inconsiderate novices, who had this stage progressed to letting their kids bounce footballs off neighbouring tents.
I had a campsite coffee before packing up and making our way to Howden reservoir.


Despite being next to Derwent reservoir, Howden res had a more open, country feel to it. Other than the designated paths of Derwent res, much of the adjacent countryside is fenced off, but not so with Howden res where you could take a stroll off the path to one side or the other, and get right down to the banks of the water if you so desired.
We made it a relatively short walk by going as far as the dam then heading back, but dragged it out by taking plenty of photos along the way.


By the return leg the sun had finally come out, a day late. I knew it was worth me packing those zip-off trousers......


Sunday, 2 August 2015

Review: Hi-Tec Venture & Hi-Tec Jura

This might sound like a queer statement: I aspired to owning Hi-Tec's.

When I was a lad, if you wore Hi-Tec trainers to school you got bullied, plain and simple. But 25+ years later it seems like Hi-Tec have made a name for themselves in the outdoor footwear genre. They've won several awards and after reading many a positive review I decided that Hi-Tec could offer everything I wanted without spending a fortune. They were my footwear of choice.
That's not to say I didn't try out other (more expensive) brands as well; I did- but they did little to convince me they were worth the extra expense. And so I bought the Hi-Tec's- not one pair but three- and here is my review of two of them:

Hi-Tec Venture

I first walked into the local Hi-Tec retailer looking for some Jura's- a more-or-less full leather boot. The salesperson recommended I also try the Venture, so I did while she went way to fetch the Jura in my size. Before she had returned my mind was made up- these were the boots for me. I paid for them and was out the door without ever trying the Jura's.


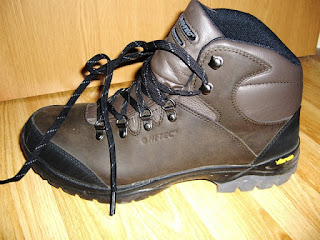
The Venture is a hybrid boot made from a mixture of synthetic and leather (nubuck/suede), with a Vibram sole. It also offers a steel shank for support. The inner is exceptionally-well padded, and right from the off these were extremely comfortable.

Now its worth mentioning that in my day-to-day life, I love trainers. I love trainers like women love shoes, and I'm not going to list how many pairs I own but its more than a normal person needs. My favourite- my most comfortable- are a pair of Nike Air Max 360's (the ones with the full-length air soles). So its no small statement when I say that the Hi-Tec Venture are not only my most comfortable walking boot, but my most comfortable footwear full stop. They are that good.

In terms of use, these have been hammered. Rain wasn't a problem, they were fully waterproof as should be expected. The poor things got some special abuse in the peat bogs atop kinder scout, and until one leg went knee-deep in bog, they were laughing off the water and mud (though they needed a good clean afterwards!).

On the downside, cleaning and re-proofing them is a chore; the number of individual panels- and more so the different materials of these panels- make the cleaning process cumbersome. Re-proofing can be tiresome if using a specific proofer for each material type, i.e. a leather proofer for the leather parts and a synthetic proofer for the synthetic parts. A general one-for-all proofer makes this process easier, though personally I prefer to use a wax for leather areas. 

I can't not recommend these boots; they do what they are supposed to do; be comfortable to walk in and keep your feet dry. That they are the most comfortable piece of footwear I own, and possibly have ever owned, is a real bonus.

Hi-Tec Jura

It was after the Kinder Scout bog incident, and noticing how clean Bob's full-leather boots were (you wouldn't think he'd even stood in a puddle, never mind been shin-deep in peat bog), that I thought again to the boots I didn't buy; the Jura's.

This time around I considered many an option, albeit all within the Hi-Tec range after my positive experience with the Venture's (and also the SPHike's in between), though for some reason I kept returning to the Jura's.


Again with a Vibram sole, these mostly-leather boots feature a re-enforced toe-box and heel. The main boot is made of a 2/3rds leather section, spanning from the rear quarter of the outer to a half-way round the inner foot. I'm not sure if the tongue and rear are leather or synthetic, though Hi-Tec's suggestion is that they're leather. The insole is Ortholite and is removable. While these haven't been tested in the rain as yet, all the stitching looks sound and is double-stitched throughout, unlike the Venture.

There are still too many individual panels for my liking, but this is not uncommon at their price-point. Hi-Tec's own Lakeland boot uses less panels, with a full leather panel extending right round to the rear of the outer foot, though has a butt-stitch on the inner foot that looks less waterproof and durable than overlapping panels (it was this fact alone that made me choose the Jura's over the Lakeland's).

I must say that the fit is totally different to the Venture's; while the latter were supremely comfortable straight out of the box, the Jura's initially felt tight to the point I thought I might return them. A slackening-off of the laces and a short walk in them made all the difference, and I would have no qualms about trialling them over a day's hike.


Conclusion


Both these boots are great for relatively little outlay. Of the two, the Venture has the edge on comfort- not just over the Jura but over most trainers, shoes and boots I have ever owned- it is my go-to boot whenever I can justify wearing it, which often includes walking where really a trainer would suffice.
The Jura is a respectable boot in its own right, easier to clean than the Venture and arguably more water-tight thanks to its less individual panels and double-stitching (although I have yet to prove this to be the case), but may take some adjustment and/or breaking in.

Footwear fit is a very personal and subjective thing. Bob and the wife have Salomon's and they love them. I tried a pair of Salomon's and I found them very uncomfortable. It seems like an obvious statement but don't buy footwear without trying them on first. All my Hi-Tec's are in my native shoe size- that is to say I didn't have to buy a size above as many recommend to do.


Hi-Tec Venture

Hi-Tec Jura


Tuesday, 28 July 2015

Bad Advice

If there's one thing I hate (who am I kidding? I hate everything) it's people who give out bad advice, particularly those perceived to be somewhat of an authority on the subject of which they speak; people who believe everything they read or hear then repeat it as gospel, or those who confuse their own opinions with fact. People who, basically, talk sh*t.

One of the reasons we set up this blog was to give a little back. We've relied heavily on other people's reviews over the years, be that of a product or a hiking route, or a place in general.
We made our own bad decisions along the way, and will no doubt continue to make bad decisions, but by telling others hopefully they can avoid making the same mistakes, and so we write our own reviews so that we can help others in return.

But a bad review (when I say bad, I don't mean negative, I mean biased, ill-informed, inaccurate, etc) is worse than no review at all. If you can't find any reviews on a product or place or anything at all, you are left with two choices- take a punt and go for it, or leave well alone. You'll evaluate things yourself.
If you read a bad review that leads you to believe something is good, particularly from someone who appears to know what they are talking about, this may well make up your mind for you, or at least heavily influence it.

Unfortunately, 2014 Outdoor Blogger of the Year, The Girl Outdoors, is full of such bad advice. I'm sure it is not intentional or out of spite; I believe it's fueled by ignorance and a quest for free gear.

Such gems include suggesting "cheap and cheerful pop-up tents" are suitable to "face the elements" advocating the use of disposable barbeques and worse- lighting open camp fires*, recommending tin cups and plates (didn't they stop making those half a century ago?) and favouring marshmallows over a first aid kit in her "camping ultimate packing checklist".

The reviews, if you can call them that, read like marketing scripts, and despite stating that the reviews are 100% objective, she also states that she does accept corporate sponsorship and advertising, going on to list the brands that she has "worked" with which funnily enough often turn up in her product reviews.

I'd be hard-pushed to think of any product in any walk of life that I couldn't find a single negative point for (I've just got high standards), yet criticism is something that's distinctly lacking, as is any real detail or comparison to similar products, even within the same brand's own line.

Quantifying her stance, she states "I do get sent gear to test out by nice brands but I will only feature kit that I really like to use"; In other words, don't expect to read a negative review on her blog. Reassuring news to manufacturers considering sending her gear, I'm sure.

Much as an artist doesn't only use one brush, camping and hiking gear varies wildly depending on where and when it is to be used, but there is a lack of context to reviews and recommendations on The Girl Outdoors, which could easily result in people choosing the wrong equipment for the wrong task.

So, 100% objective reviews from someone who receives money from the brands she's reviewing and won't post reviews of products she doesn't like. Perhaps she should review the dictionary definition of "objective"?

Now it may seem I'm gunning for The Girl Outdoors, and that's genuinely not the case. She's obviously passionate about the outdoors, and that she tries to encourage others to enjoy it should be commended. That said, she is clearly ignorant of the basic do's-and-dont's, lacks any technical knowledge and writes reviews based on her own best interests rather than her readership's.
Had she not won Outdoor Blogger of the Year, I would dismiss it as just another load of old rubbish in the sea of tripe that is the internet. But that accolade gives an air of credibility to what otherwise may have been ignored, and so the bad advice gets lapped up, and no doubt passed on in turn, and people make bad decisions that could possibly have been otherwise prevented.
Her latest post- "Beginner's guide to camping", is quite clearly aimed at people who may not know much on the subject, yet once again she advocates lighting open fires, despite being previously lambasted for posting photographs of her wild camp in the Brecon Beacons where her and her companions had torched the ground with an open fire.

I'm loathe to post a link to The Girl Outdoors, but with any luck the back-links on Google will highlight this post and and stop people giving credence to her advice before the entire countryside goes up in flames.


The Girl Outdoors


**UPDATE**

After writing this post, and following comments between Sian and I on this blog (see below) and hers, to her credit she has updated her post to point out that not all campsites will allow disposable BBQ's or campfires.
While she is yet to make the position of campfires in the wild clear (i.e. not acceptable), at the same time the article no longer insinuates that it is OK to light one up. While this is a step in the right direction a clear statement on the legalities would be preferable to skirting round the matter, though I have to say fair-play to Sian for amending her blog and also for the polite and professional way she has conversed with me on the subject.

********


*Lighting fires on private land is illegal in the UK without the landowners permission, and generally forbidden on campsites. Given that wild camping is technically illegal anyway (apart from Scotland), lighting an open fire in the countryside is not only stupid, but a sure-fire way to get yourself kicked off the hill.
Many campsites don't allow disposable barbeques because they scorch the ground and pose fire risks (not to mention the dangers of using them inside a tent), although some provide designated areas or paving slabs upon which to use them, and you should be allowed to use them if elevated off the ground on a camping table or cook stand. Check with your intended campsite first if you are relying on a barbeque as your primary cooking source.


Sunday, 19 July 2015

Andrew White

A short time ago I wrote about a walk around Elsecar organised by Radio Sheffield and Andrew White, and what was initially slated as a one-off event has blossomed into a short series of walks tied in with Radio Sheffield's "Love Where You Live" feature.

Unfortunately prior arrangements have prevented me attending all but the final walk, today, around Barnsley. Under normal circumstances this would have been a write-up of that walk, but I thought I would take a different tack and write about the architect of all the Radio Sheffield walks, Andrew White.

Now its doubtful Andrew would regard himself as a celebrity, though many people with a lesser résumé have masqueraded under that banner. Andrew is a writer, presenter and film-maker, but above all that he is a thoroughly nice bloke who enjoys what he does which, ultimately, is being outdoors.

Its impossible not to like someone who's enthusiasm shines through in such a way; here is a man guiding a walk not because he has to or because he's being paid to, but because he wants to- because that is what he enjoys.
His local knowledge is outstanding; the kind of guy you could spend the evening in the pub with and never get bored of hearing accounts of his adventures or interesting facts, yet whom manages never to make it all about himself.

With any luck the Radio Sheffield walks won't end today, and- with any luck- Andrew will be the orchestrator of all their future walks, for I can't imagine a nicer and more informed man at the helm- even if he spends most of his time leading from the back!


Andrew White


Saturday, 4 July 2015

Review: TrangoWorld Skin Micro Lite Sleeping Mat

Therm-a-Rest, Exped, Multimat. Some of the first names that might come to mind when thinking of sleeping mats. Then perhaps Alpkit, Mountain Equipment, Vango. Maybe even Snugpak, Outwell or Coleman. What about TrangoWorld? Probably not.

For those who have never heard of TrangoWorld (I hadn't before embarking on my sleeping mat quest), they are a Spanish outdoors company with a history stretching as far back as the 1920's, and if their website is to be believed in the 70's and 80's they had a 40% market share of camping goods. So they've been around. In the UK today they may be best known for their trekking/mountaineering trousers which have become highly regarded.

One thing that's evident when looking at TrangoWorld's substantial line-up is that they put some effort in. These aren't just mats that are picked up from some Chinese OEM manufacturer and then a name slapped on, there is research and design involved, with materials and technologies consistent throughout the range. Their sleeping mat catalogue covers both inflatable and self-inflating mats, in full and 3/4 lengths.

The Skin Micro Lite is their top model of self-inflating mat, and gains its name, one assumes, from its fairly low 540g weight*, and its "skin" covering. This "skin" is their ArtiStretch polyurethane material, which is extremely thin and no doubt helps to keep the weight down to a minimum. This also means you are closer to the foam inside.
Another of their technologies, ArtiStop, is a coating (or something in the PU mix) that creates a non-slip surface on the mat, and I have to say this works a treat- once I'm on the mattress I stay on it.

Trangoworld Skin Micro Lite self-inflating sleep mat
 Photo courtesy of TrangoWorld


The Skin Micro Lite is 30mm thick, which offers a 20% increase over the 25mm that is common amongst its competitors. And while it isn't like sleeping on a memory foam mattress, its thick enough to not feel like you are sleeping on the floor. It packs down to a reasonable size, and the included stuff sack is for once just the right size, rather than being slightly too small as most manufacturers of anything that goes into a stuff sack seem to prefer.

Now, for anyone who doesn't know how a "self-inflating" mattress actually works, here's a little explanation: Self-inflating mattresses are essentially foam with a cover on. When the mattress is rolled up and put away, the foam is compressed and air that sits within its structure is forced out through a valve. This valve is then closed. When the mat is unrolled for use (and the valve re-opened), the foam expands and draws air in though the valve, which is then closed to stop it escaping when you lay on the mattress. It is normal to have to give a couple of blows into the valve to "top up" the mattress. And this leads me to my only criticism of the Skin Micro Lite:

It does not self-inflate. Not at all. When I first got it I left it a full 24 hours and it was still flat as a pancake. Neither has this improved with use- every time I use this mat I have to blow it up myself. That said, I'm talking maybe 4-5 good blows- certainly better than blowing up an air mat, and with all the added bonus of foam insulation- so it really isn't a big deal.

Talking of insulation, the TrangoWorld has an R-value (the rating for thermal resistance often quoted in sleeping mat specs) of R= 3.41. The trouble with R values is there are two formulas for calculating them- imperial and metric. American companies and those with something to hide use the imperial method, which gives a higher value, so unless you know by which method an R value has been calculated it is impossible to compare them. With TrangoWorld being Spanish, one would assume that they use the metric calculation which means 3.41 is a very good figure indeed, but it seems almost too good to be true for a mat of this weight and price, so they may indeed be using imperial measurements.

There is a lot of competition in the sleeping mat market, and far too many for me to start listing competing products, so suffice to say that when I bought this mat a few months ago, at the price I paid (about £30), it was hands-down the best mat when taking the four factors of weight, thickness, insulation and price into account.  


2021 UPDATE: Having recently been asked by a friend to spec them a hike/camping kit, it's incredible to find that in the six years since I wrote this review no-one has come close to touching the Skin Micro Lite in this price range. There is literally nothing that compares to it (even the Decathlon Quechua A100, which came a close second to the shorter version of the Skin Micro Lite, has been discontinued - see my original review here). Even Therm-a-rest's brand new 2021 Trail Scout mat - which will hit your pocket for about 50% more than the Trangoworld - is thinner, heavier and a few centimetres shorter, even if it does match the R-value.

NOTE: In 2020 the way of measuring R-values was standardised across the industry, making comparisons between mats a lot easier now.


*The mat's advertised weight is 540g, however mine weighed in at 600g in its bag and 570g out of it. I've heard this is a common issue with self-inflating mats for some reason- that they vary considerably in weight and manufacturers take an average for their product specs.


TrangoWorld Skin Micro Lite


Friday, 3 July 2015

Product Weights

Its about time I had a rant about product weights, having just bought yet another item that was well over its advertised weight.

So let me flesh this out. When I say "yet another", I say that because the vast majority of gear that I have bought tips the scale above what the manufacturer's claim. Now the odd gram here or there doesn't bother me (despite the fact that it all adds up)- I expect and accept that. I'm talking about when a product is significantly over the limit.

For example, the 380g sleeping mat that actually weighs 440g, or the 540g sleeping mat that actually weighs 600g, or- wait for it- the 700g rucksack that actually weighs over 1200g! Those are my three most recent purchases that have pushed me over the edge.

So why is weight so important? Well, for me personally I look to lighten my load because I have bad knees, and the less they have to lug around the better. Many ultralight campers will be in a similar boat. Because I've saved 30g here and 100g there, my pack now weighs over 2kg less than it used to. So when you're talking about saving weight, weights really are important. But that aside its the simple principle of getting what I paid for.

Somehow, manufacturers seem to get away with this practice. Often the get-out involves weighing "incomplete" items- a sleeping bag without its stuff sack, a water bottle without its lid, a tent without its pegs- without disclosing this fact, of course. That, or just outright fabrication of figures.

This "manipulation" of weights seems commonplace yet at the same time accepted. However, lets reverse the concept and transpose it to a different scenario: Imagine a big supermarket was overestimating product weights and were, on a daily basis, selling 1kg packs of beef that actually contained just 700g of meat. There would be a huge scandal, watchdog's would be involved, share prices would plummet and criminal proceedings would possibly take place. Yet when the opposite happens in the outdoor gear industry, nothing happens. Surely false advertising is false advertising?

Now I've heard that self-inflating sleeping mats can vary wildly, so manufacturer's take an average weight. If so, that means if my 380g mat weighs 440g, then somewhere there is one that weighs 320g. If that's the case you need to sort your manufacturing tolerances out. 

Its refreshing to be able to report that not all manufacturers feel compelled to succumb to these shady practices, however, and I do have many items that were not just the correct weight advertised, but actually less than that, and that really is the mantra of good business:

If you over-promise and under-deliver, you're only going to piss people off and create distrust in your brand. Maybe you'll gain a few extra sales that you wouldn't have got by being honest about your product, but you'll destroy your repeat-custom potential and risk your reputation by word-of-mouth. Far better to under-promise and over-deliver, and gain customers for life.


Friday, 19 June 2015

Ultimate Camping Kit List

This is always a popular discussion point amongst forums and bloggers, and so I thought I would post up my Ultimate Camping Kit List:

There's no such thing. The end.

Of course, I must explain myself: For one thing, everyone is different. Some people are tall and some are short. Some are fat and some are thin. Some are naturally cold and some warm. For these reasons alone I don't believe there are many- if any- one-size-suits-all solutions when it comes to equipment and clothing. And even if there was, the nature of industry is that products are always evolving, so what is the best today might be rubbish by tomorrow's standards.
Then there is usage to take into account; gear and clothing perfectly suited to campsite camping won't be much good for someone spending their nights sleeping on the side of a cliff.
And then of course there's budgets- unless money is no object you will no doubt be restricted along the way by the cost of products, prohibiting you from buying what you may consider to be the best, and preventing you from developing an informed decision on the suitability of a certain product.
And if that wasn't enough there's weather and seasons to take into account!

So there's no "Ultimate Camping Kit List", only the ultimate kit list for you personally. And to that end, very little point in dictating a list of items that may be in part or in whole unsuitable for any given person or their circumstances.

Currently I have five different set-ups depending on the type of outing planned. Some of these set-ups share items, while others have items specifically for that kit. These are:

Mine & The Wife's Multi-Night Campsite Kit: This is a big 3-man tent with living area, and pretty much contains everything but the kitchen sink. I can't even bring myself to go into detail because it blows my mind how many things the wife thinks we need to take.

Mine & The Wife's One Night Campsite Kit: A smaller 3-man tent for single-night camps when it just isn't worth taking the big tent. The kit list is much more limited with little more than the basics- sleeping bags, air beds, stove(s), etc. We tend to eat out on these short trips so cooking is more or less limited to breakfast.

My Solo Campsite Kit: This was born from Bob and I campsite-camping for my birthday, where we came to realise we could walk further if we weren't lugging huge packs round with us. During that trip it seemed daft being crammed into a small solo tent when weight was no longer an issue, hence I put together a new kit with a larger 2-man dome tent, air mat and folding stool. With water not being in short supply on a campsite, my Alpkit gas stove offers boil-in-the-bag convenience for a quick breakfast. A 25l rucksack is perfect for taking water/drinks, lunch, a jacket etc out for the day's walking.

My Wildcamp Kit: My original (and constantly evolving) kit, housed in a 65l rucksack. This is geared for 3-season camping, though for summer months may be a bit overkill. I use my spirit stove in this set-up, as its easier to cook up a proper meal and means I don't have to depend on water to make it (unlike dehydrated food or boil-in-the-bag).

My Ultralight Summer Wildcamp Kit: My sleeping bag always took up the majority of the main compartment in my 65l rucksack, but when I got a diminutive summer sleeping bag I realised this could change. My summer pack is based around a 45l rucksack, with an onus on the ultralight. Its still a work in progress- I intend to change my full length sleeping mat for a 3/4 and a new pillow is on the cards- as I aim to get the total pack weight, including food and water, down to under 7kg. This relies on finding a water source along the way, and incorporates dehydrated food.


I could endlessly list all the items in each of my kits, though as previously mentioned it would be a largely fruitless exercise as in this instance what's good for the goose isn't necessarily good for the gander, and can be very much dependent on where you intend to go and what you intend to do when you get there- as proven by the fact that I myself have five different set-ups.
Items from my ultralight set-up could well be used in a different kit, but in order to be ultralight sacrifices are usually made, either in comfort or space or usage options. Conversely the nice comfortable airbed or lovely capacious tent in my campsite kit is far too heavy to make it into my ultralight pack or even my standard wildcamp kit.

So there you go- no ultimate list. Anti-climactic I know, but better than me dishing out bad advice.


Saturday, 6 June 2015

Review: Alpkit BruKit Stove

After my early bad experiences with a Campingaz Micro Bluet gas burner, I was a spirit-stove convert. In truth, I still am. But when I saw a subscription offer for a popular outdoor magazine offering free Jetboil's, I managed to make a convincing argument to myself for making a return to gas.

For reasons I won't go into, I didn't end up with a free Jetboil, and my argument for getting a gas stove wasn't strong enough to warrant shelling out for one, so I had a look at what else was out there. One stove in particular stood out a mile, not least because it was half the price of its nearest rival. That stove was the Alpkit BruKit.

I'm sure Alpkit won't mind me saying that their BruKit is really a re-badged Fire Maple stove- no bad thing, considering that the original version could cost you twice as much.

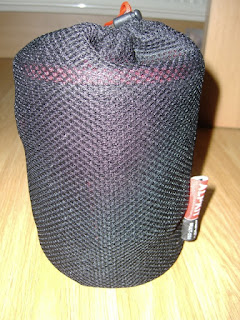
In a similar vein to other such stoves offered by Jetboil, Primus and MSR, the BruKit combines a pot and heat exchanger plus burner, and the pot is large enough to hold the burner and (supposedly- see below) the gas canister when packed away. Also included is a neoprene "pot cosy", lid, and a nice mesh bag to pack it all away in. Some people have commented that they struggled to get the stove back in the bag, but I didn't find this a problem at all.

Alpkit BruKit packs away into its own bag

The pot locks into the burner easily but firmly, and all the components appear well made.

The pot itself is fairly large at 1.3 litres (Alpkit state variably that the pot is 1 litre and 1.2 litres. I got the measuring jug out and it'll take 1.3 litres with room to spare), and anyone used to the 1 litre pans of a Trangia 27 won't know what to do with all the extra space. Personally I could have made do with a much smaller pot- 1 litre max- but this is obviously subjective depending on how you plan to use the stove. It also needs to be this big to fit the burner and gas into when packing away.


Testing the BruKit indoors, the piezo ignited the gas first time, and I soon had 750ml of water on the boil. I didn't bother timing how long this took; if boil times are important to you there are plenty of documented tests of this on the internet, but generally I'm in no rush when I'm out in the hills.

Once your water has boiled, removing the pot from the burner has a knack to it- while the neoprene cosy allows you to grab the pot without getting first-degree burns, it doesn't give any purchase as it just slides around, and I found the best way to disengage the two is by grabbing the lid, although those with small hands might struggle with this method. Care should be exercised here: the lid was getting warm after my few minutes of boiling, and could potentially get quite hot if the stove is running for some time.

One out-of-the-box issue is that the lid has no secondary hole to allow proper airflow when pouring- the last thing you want when dealing with boiling water. This, quite frankly, is a schoolboy error and makes you wonder how the designers have managed to get through life without ever seeing a McDonalds/ Starbucks/ Costa coffee cup lid, even if they didn't pay attention in high-school physics. Thankfully, its a very easy fix to drill a small hole through the silicone, and that solves that problem.

The BruKit lid doesn't have a secondary "breather" hole......

....A problem easily solved with a 1mm drill bit and your finger-ends.


Upon packing away the stove, I discovered that not all 230g gas canisters are made equal. In order for one to pack away into the pot, it has to sit into the burner (inside the rim in which the pot sits in use). Coleman canisters are too wide to do this, and I picked up a no-name canister today that did fit with a push, but then I found that the indents in the burner rim that engage with the pot to lock it in place also do a damn good job of holding the gas canister in- to the point where i had to prise the two apart with a spoon handle (it was to hand and I couldn't be bothered looking for a screwdriver)- not a problem you want to find yourself having out in the field, and one which may result in damage/warping to the burner rim and/or locking lugs after repetition.
Alpkit have said that Primus and Jetboil canisters will fit fine, though I haven't managed to find one yet to test.
It should also be noted that even if the canister won't fit inside the pot, the supplied bag is long enough for you to sit the gas on top of the lid and draw the bag closed around it, and while this takes up more space than intended at least your canister won't be rattling around in your rucksack. 

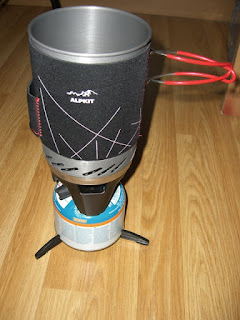
Alpkit BruKit, assembled and with gas attached

The stove's primary function is boiling water, and at this it excels. While I'm sure some people do cook (well, re-heat) meals on it, this type of stove wouldn't be my first choice for doing so. The design of these stoves is to focus all the heat into a relatively small surface-area and as such the pots tend to be tall and thin, and the flame is pretty ferocious no matter what setting it is on.
This is perfect for heating water but not ideal for heating food, which would require constant stirring to avoid burning the food at the base of the pot. And while ever you have the lid off to stir, you're losing heat.
This is true of all stoves of this type, not just the BruKit (though some systems do offer optional cooking-specific pots and even frying pans); use it within its intended scope and you'll be impressed and happy. Try and go beyond that and you'll be eating a burnt dinner and looking sad.

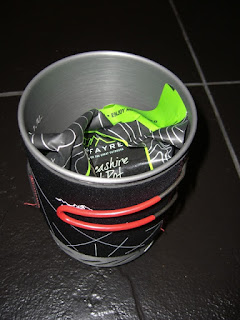
With some amount of bending and squashing it's possible to get a packet meal such as a Wayfayrer into the pot, so boil-in-the-bag may be an option, though I haven't tried this.

Alpkit BruKit is large enough to cook boil-in-the-bag food

Alpkit are currently supplying canister supports with the BruKit, but if you miss this offer they are available online for between £3-£6, and I would consider these essential due the high centre of gravity of the stove when in use.

My argument for getting a stove of this type was that I wanted something compact, lightweight and convenient for making a brew up a hillside, and I'm not disappointed. It's debatable whether it is better in any of those categories than my spirit stove, but that's a different argument. It's also not without its minor niggles- a breather hole in the lid is a must, and if the entire thing had been made about 3mm wider in diameter (or 10-12mm taller) it would have been compatible (in regards to packing away) with all 230g canisters rather than just some.

Even taking these niggles into account, it's most certainly excellent value for money, and while I couldn't say it's quite as good as some of the bigger brands (nor would I expect it to be), I think it would be a difficult task to convincingly argue that the bigger brands were worth the extra expense- at least double the price- over the BruKit.


Alpkit BruKit


Sunday, 31 May 2015

My Birthday In Edale

For my birthday this year, Bob and I decided to go back to Edale and Kinder Scout, though this time we thought we'd campsite-camp so that we could have an evening in the pubs after a hard-days walking.

We arrived in Edale a lot later than expected, thanks to the sat nav sending us on the scenic route. With it being the bank holiday weekend we hadn't actually managed to get booked into a campsite and were taking our chances at being let in somewhere on the day, and luck was on our side when we rolled up to Field Head campsite. We pitched up, made a brew then set off.


Just a few hundred yards from our start point we came across a big ginger dog sh*t, complete with a fly. I took a photo, but I'll refrain from posting it. It seems like there's just no escaping these people.

Without our great big packs on our backs, we soon found we were motoring along nicely and were at the foot of Jacobs Ladder in no time at all. This presented us with the perfect opportunity to test out Bob's new water filter, filling our bottles from the stream, and it tasted just as good as the tap water we'd just emptied from them.


Lunch was taken atop some boulders, where we were treated to fantastic views that the fog had completely obscured on our last visit.
Our aim this time was to get to Kinder Downfall then turn back, but we were making such good progress that we decided to try and complete the route. The weather was just right; warm and sunny, though the clouds would come over just as the sun threatened to get too hot.


We arrived at Kinder Downfall, which in truth was a bit anticlimactic (we had been expecting some Niagara Falls-esque waterfall) and were getting on at a fine speed- then we hit the bogs.


Out of nowhere the path started to get muddy. Then it started to get very muddy. In our infinite wisdom we decided to ascend the sides of the mini ravine that formed the path, thinking the ground must be better higher up. How wrong we were. We were in the middle of peat bogs. There was no point trying to walk on this terrain, you just started to sink, so we ran from one rare piece of decent ground to the next, our boots going in past the ankle with every step. A few heroic jumps were required at the worst bits.
The terrain slowed us down tremendously, and all of a sudden time was disappearing fast and we wondered if we would ever get out of these damned bogs, but thanks to my GPS and The Walking Englishman's route, at least we knew we were heading in the right direction.


Eventually we did come to the other side and were back on terra firma once more. We still had some way to go though, so when the opportunity presented itself to cut a corner off our route we took it, only to find ourselves faced with another bloody hill which was twice as hard to come down the other side of as it was to go up.


It was almost a joy to see the ginger dog sh*t again (though now it looked like it had been trodden in), as like a homing beacon it marked our proximity to our journeys end, and we went straight into the pub for a well deserved pint. The bogs had really taken it out of us, though that said we still made it round the route in a respectable five hours.


It was back to camp for a shower- drying ourselves on our t-shirts since we had forgotten to bring towels- then off out for tea and more beer.
It was just gone eight o'clock when we left the campsite, but the sun was still shining and the beer garden at the front of The Rambler Inn was full of like-mined people enjoying a good meal and a pint. We joined them for a few, then had a wander to the other end of Edale to The Old Nags Head, then back down the Rambler's.

By eleven o'clock we were knackered and decided to call it a night, thankful for Bob remembering to bring his head torch for the walk home as the streets of Edale were pitch black.

Despite a late rise in the morning, we managed to make time for a bacon butty and a coffee in The Penny Pot cafe before heading back home to clean the peat off our boots and trousers.

I couldn't have wished for a better birthday.


Field Head Campsite

The Rambler Inn

The Old Nags Head


Tuesday, 26 May 2015

Review: Wild Country Zephyros 2 (Field-Tested)

Following on from my previous write-up of my new backpacking tent, Wild Country/ Terra Nova's Zephyros 2 (read it here) , I have finally managed to get out and about with it, and I can say I'm not disappointed!

The tent was even quicker to erect the second time around, and really takes no thinking about. Although smaller on paper than Coleman's Cobra 2- the tent I was replacing- the Zephyros doesn't taper down to the same degree at the foot so in some ways it feels more capacious. On the other hand, the taper at the head is a gradual one emanating from the centre of the tent, so there is less headroom when laying down which some might find a bit claustrophobic. I must say I didn't, and it was just the right size for my 6'3" length- though I wouldn't want it any smaller.

Unlike the Cobra, where I used to worry about my feet resting against the inner due to its proximity to the fly, there really is no chance of the two touching at any point such is the amount of space between them.

I was lucky enough for it to rain on the night of my trial run, and as you would expect the Zephyros held this off with ease. Not only that, but there wasn't a drop of condensation inside the inner when I woke in the morning, something which I've never managed to avoid before no matter how much I messed with the vents.

Getting it back in the bag was the usual torturous affair, but I won't hold that against what I would otherwise consider to be the best solo backpacking tent under £150*


NOTE: Its worth mentioning that the 2015 version of the Zephyros 2 has a second door.

2021 UPDATE: I have now replaced this tent with the Naturehike Mongar 2, mainly it due to it being lighter yet much more capacious. See my full review of the Mongar 2 here


*I don't consider most "one-man" tents to be tents- they're more like glorified bivvy bags- so when I say best solo tent I'm really talking about two-man tents. 
  

Sunday, 17 May 2015

BBC Radio Sheffield Elsecar & Wentworth Walk

As I was driving home from work the other day, I heard an announcement on the radio that BBC Radio Sheffield's Rony Robinson would be hosting a walk around Elsecar and Wentworth on Sunday 17th May (today). With the wife at work, and a brand new camera lens in need of a trial run, I thought why not pop along?


The meet was at Elsecar Heritage Centre at one o'clock. I thought I'd get there nice and early but still struggled to find a parking space. I was quickly introduced to Andrew White, who was leading the walk, and a chap called John from the Heritage Centre who was a fountain of knowledge on the local history.


Rony rolled up with his dog Jack and the rest of the BBC crew (including Mick Lunney) in toe, and before long we were off, heading out through King's Wood where the bluebell's were out in full force.


The walk was a nice steady route, suitable for all ages (and indeed all ages were present), with plenty of stops along the way for those who needed a break. The weather, while always threatening rain, was good to us, and a relatively warm- though overcast- afternoon was complimented by a nice breeze and punctuated with the odd burst of sunshine.


The halfway point was the stunning Wentworth Woodhouse- the largest privately-owned house in Europe- where we were somewhat unexpectedly allowed into the grounds and foyer. This didn't seem like part of the plan, and I think one of the BBC team had pulled off a bit of a coup to get us in. The foyer was just as beautiful as the outside, with a 4 x 4 bank of stone columns adorning the space and statues at every turn. Tours of the house are available, and I'll definitely be attending one.


The next stop was The Needles Eye, a pyramid structure supposedly built on the back of a bet over whether a coach and horses could be driven through the eye of a needle.


We had a steady walk back, taking in the views, and before we knew it we were back at Elsecar Heritage Centre, where upon John supplied us with more information about the Newcomen Beam Engine- apparently one of the most important inventions of the industrial revolution and something I've passed many a time without even realising it was there. I had to leave at that point to pick the wife up from the bus stop.


So what would have otherwise been a boring afternoon sat at home turned into a very enjoyable and informative afternoon in the countryside. I was chuffed with my new camera lens and learned many things, not least that Mick Lunney doesn't look like he sounds.


Wentworth Woodhouse

Elsecar Heritage Centre

Andrew White


Saturday, 16 May 2015

Bakewell 2013: My First Campsite Camp

My first campsite camp with the wife was a brief one-night stay in Bakewell, Derbyshire. It was a bit of a trial-run for our new tent.


Despite being well within the grips of September, the sun was shining when we rolled up to Greenhill's Holiday Park, just outside of Bakewell. It turns out camping at this time of year has its pros and cons; on the plus side, we had the place virtually to ourselves, but the trade-off was the on-site pub was shut.
The campsite was quite a size, catering for us tenting folk, motor homes & caravans, and also had some static caravans. The toilets/washrooms were very clean, but the pot-washing facilities seemed limited to one external tap in the middle of the field.

We wrestled the tent up, bickering with each other throughout, then took ourselves on the short drive into the town centre. And here's my first tip- find out where the car parks are before you set off. We found parking to be a real struggle, only happening upon short-stay car parks despite doing several laps of the town. On our return home I did some Googling, and there does seem to be several all-day car parks, though god-knows where.


Bakewell itself is a quaint little town with windy streets and hidden courtyards, and is populated in the main by camping/outdoor shops, pie shops and cafe's. By all accounts the market is very good, though unfortunately by the time we'd pitched-up the market had packed up.

We had tea in one of the local pubs, where I sampled what seemed to be a local specialty, Homity Pie*, and I have to say I very much enjoyed it- so much so I bought a couple from one of the pie shops to take home with me.
Bakewell pudding- not tart- is the real specialty of the town though, and very much worth a try.


The quantity of outdoor shops led me to believe that Bakewell may be a good base for some country walking, but unfortunately our stay was too brief for us to explore this further. If this is the case, then it would be worth a return trip, but otherwise its the kind of place you can see in a day.


*Homity pie seems to be on the menu of most pubs in Bakewell, and available in most pie shops. Despite this, I can't find any reference of it being affiliated with the town, and all indicators are that it is a traditional British dish with its origins in WWII at the time of rationing.


Greenhills Holiday Park

Bakewell Online


High Cup Nick: A Tale Of Two Halves, Part 2

Our next trip to High Cup was a somewhat more impromptu affair; we had been all set to go to Malham, but at the eleventh-hour decided to return to more familiar territory.
 
As our last trip had ended prematurely, having only got half-way round our planned route, we decided to start in the opposite direction this time, heading anti-clockwise. This route seemed to take us predominantly on little country lanes, so the going was much easier.


When we finally got off the beaten track we were amazed at just how different the terrain on this side of the valley was compared to the other; a lot greener and not a rock in sight. On our first trip we had seen a small mass of water across on this side, so decided to try and find it, and before long we were sat down next to it having our lunch.


Unlike our last venture, we very quickly found an ideal spot to camp- a nice grassy divot in the shelter of the hills- but it was far too early in the afternoon to pitch up, so we carried on walking. We stopped short of the apex of the valley, then wandered down into the valley itself to see things from that perspective before heading back to our spot for the night.

It was a glorious day weather-wise, and as it was still a bit early to get the tents out, we threw ourselves down on the floor and basked in the sun, amazed at how deathly-silent our surroundings were.


Teatime came and went, and before we knew it it was time to bed down for the night. The morning brought none of the fog of our previous visit, so we were able to enjoy the views once more over a mug of coffee, before heading back the way we came.


Our two High Cup trips were very different. I wouldn't necessarily say I enjoyed one more than the other, although for a single night's camp I would favour this side of the valley.


Monday, 11 May 2015

High Cup Nick: A Tale Of Two Halves, Part 1

Our first foray into wild camping was High Cup Nick in the North Pennines, upon recommendation from a friend. High Cup Nick is a valley that looks like it may have been created by a meteor or some such, and our plan was to walk around the top rather than descend into the valley itself.


We set off from Dufton full of enthusiasm, and our packs full of things we later realised we didn't need. No sooner had we set foot on the Pennine Way, we discovered we were in for a steep learning curve. Our packs were grossly over-weight and our bodies out of shape, and we found ourselves stopping at every gate we happened on for a rest.


Before long we had managed to stray off the beaten track, but found a nice spot to sit and have a bit of lunch and take in the stunning views, before having to run- well, scramble- up the side of a hill that felt like a 4 in 1 to try and get back on the path without having to backtrack on ourselves.


We had decided to tackle the route from a clockwise direction, taking us up the left-hand side of the valley, and while not too difficult even for us novices, the terrain was fairly rocky with a lot of going up and down- not great for my dodgy knees- and we were glad we'd taken walking poles with us.


We reached the apex of High Cup Nick around 4 o'clock, and the plan had been to pitch up in the vicinity and finish the walk the next day, but the wind was ferocious coming out of the valley and, concerned that our tents wouldn't withstand the battering, we had a good think about our best options. Despite not noticing anywhere particularly suited to pitching-up on the way so far, we decided to head back the way we came, reasoning that if we couldn't find anywhere to camp we could always go back to the car.


The gods were with us, however, and we managed to find the only decent spot in a section of the route that we had bypassed on the way out when we'd drifted off the track. Pitched on a slight incline, we spent most of the night in the bottom halves of our tents.

With the morning came the fog, and the wondrous views of the day before had all but vanished, so we decided that we hadn't done bad for a first attempt and made our way back to the car, aching all the way.